Energy Efficient Housing:
Building a passive solar home. Piece of cake...not. We embarked on one of STEM Marin's largest projects yet. Thanks to a $5,000 grant from PG&E, we were given the chance to make a one hundred twenty square foot building. The trick was that we needed to maximize the amount of daylight let in and use no electricity to heat and light it. After many tests and designs, we were able to accomplish our goal. Here is a step by step explanation of how my group and STEM Marin built a passive solar building.
Building a passive solar home. Piece of cake...not. We embarked on one of STEM Marin's largest projects yet. Thanks to a $5,000 grant from PG&E, we were given the chance to make a one hundred twenty square foot building. The trick was that we needed to maximize the amount of daylight let in and use no electricity to heat and light it. After many tests and designs, we were able to accomplish our goal. Here is a step by step explanation of how my group and STEM Marin built a passive solar building.
Solar Water Heater:
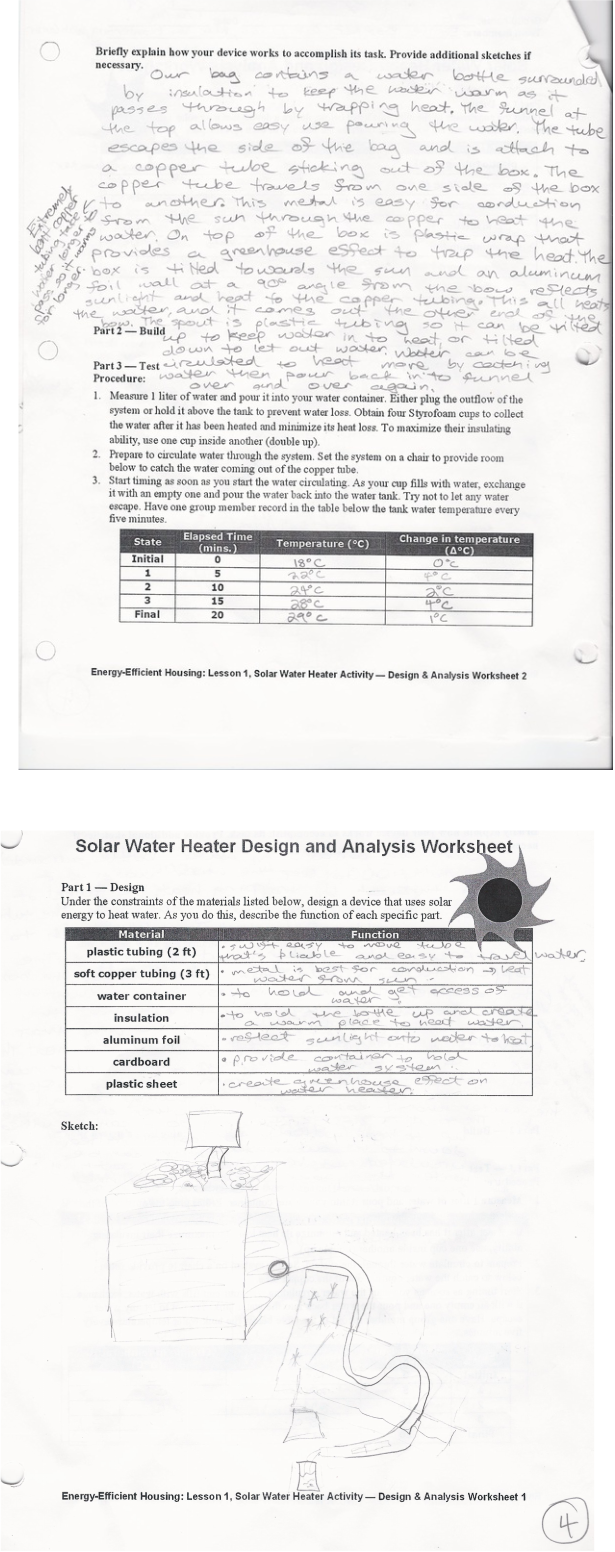
At the very beginning of our project, we wanted to execute an experiment on how a solar water heater works. This experiment gave us knowledge about conduction, radiation, and convection. We learned that an example of radiation is how the sun's rays travel through space. Convection is when heat is transferred through water, like when cooking pasta. Lastly, we found that our solar water heater demonstrated conduction very well. Conduction is when heat travels through a solid material. Our solar water heater used several materials to heat the water.
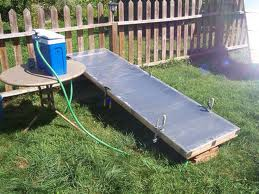
Each group in our class was given a set of instructions to build the solar water heater. To prevent having the same exact replicas, Mr. Williams advised us to add a twist to our design. The materials we used to build our solar water heater were a paper bag, a shoebox, some type of insulation (newspaper), plastic and copper tubing, aluminum foil, syran wrap, a liter plastic bottle, and black spray paint. The next step was to build it.
1. Place a hole on the side of your plastic bottle and bag just big enough to fit the plastic tubing. Place one end of the plastic tubing into the bottle and seal any holes with water sealant glue. Stick the continuous piece of plastic tubing through the bag also.
2. In the shoebox, make an S-shaped curve out of copper tubing. Stick one end on each side of the box.
3. Attach the plastic tubing sticking out of the bag and the copper tubing sticking out of the box together. Seal with water sealant glue.
4. Insulate the bag and shoebox with the newspaper to keep the heat in the water.
5. Place your paper cups below the copper tubing that is sticking out of the box (opposite from where the plastic tubing is attached to the copper tubing).
6. Pour water into the bottle that is in the bag. Once the water has gone through the bottle and through the plastic tubing into the copper tubing in the box, catch the water that falls out from the copper tubing outside the box. Cycle this water through the solar water heater and record temperatures at different time periods.
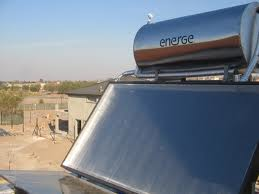
What did we discover from these instructions? The instructions didn't work very well. Inspired by Poh, we came up with our own design. We predominantly stuck to the structure of the instruction's solar water heater, but we made a few changes. First, we made a funnel so the water,could be easily poured into the bottle without soaking the insulation. Next, we used hit glue on all the sealing, which frighteningly worked a lot better than water sealant glue. Then we set up a reflector made of aluminum foil at the back of the box. Therefore, light would be reflected from the sun onto the copper tubing in the box. Finally but most importantly, we created an extension of tubing where the water was supposed to pour out. This consists of plastic and copper tubing. The logic behind it was that the longer the water was in the copper tubing, the more heat it would absorb. It worked very well. After twenty minutes, our water heated up by ten degrees Celsius. From this experiment, we saw first handed that when the light hit the copper tubing, the heat was transmitted through to the water. This is a great representation of conduction. Also, it showed that metal is a great conductor compared to something like plastic. If you are interested more about our experiment, here are our results, and pictures of several different homemade and official solar water heaters. ,
At the very beginning of our project, we wanted to execute an experiment on how a solar water heater works. This experiment gave us knowledge about conduction, radiation, and convection. We learned that an example of radiation is how the sun's rays travel through space. Convection is when heat is transferred through water, like when cooking pasta. Lastly, we found that our solar water heater demonstrated conduction very well. Conduction is when heat travels through a solid material. Our solar water heater used several materials to heat the water.
Each group in our class was given a set of instructions to build the solar water heater. To prevent having the same exact replicas, Mr. Williams advised us to add a twist to our design. The materials we used to build our solar water heater were a paper bag, a shoebox, some type of insulation (newspaper), plastic and copper tubing, aluminum foil, syran wrap, a liter plastic bottle, and black spray paint. The next step was to build it.
1. Place a hole on the side of your plastic bottle and bag just big enough to fit the plastic tubing. Place one end of the plastic tubing into the bottle and seal any holes with water sealant glue. Stick the continuous piece of plastic tubing through the bag also.
2. In the shoebox, make an S-shaped curve out of copper tubing. Stick one end on each side of the box.
3. Attach the plastic tubing sticking out of the bag and the copper tubing sticking out of the box together. Seal with water sealant glue.
4. Insulate the bag and shoebox with the newspaper to keep the heat in the water.
5. Place your paper cups below the copper tubing that is sticking out of the box (opposite from where the plastic tubing is attached to the copper tubing).
6. Pour water into the bottle that is in the bag. Once the water has gone through the bottle and through the plastic tubing into the copper tubing in the box, catch the water that falls out from the copper tubing outside the box. Cycle this water through the solar water heater and record temperatures at different time periods.
What did we discover from these instructions? The instructions didn't work very well. Inspired by Poh, we came up with our own design. We predominantly stuck to the structure of the instruction's solar water heater, but we made a few changes. First, we made a funnel so the water,could be easily poured into the bottle without soaking the insulation. Next, we used hit glue on all the sealing, which frighteningly worked a lot better than water sealant glue. Then we set up a reflector made of aluminum foil at the back of the box. Therefore, light would be reflected from the sun onto the copper tubing in the box. Finally but most importantly, we created an extension of tubing where the water was supposed to pour out. This consists of plastic and copper tubing. The logic behind it was that the longer the water was in the copper tubing, the more heat it would absorb. It worked very well. After twenty minutes, our water heated up by ten degrees Celsius. From this experiment, we saw first handed that when the light hit the copper tubing, the heat was transmitted through to the water. This is a great representation of conduction. Also, it showed that metal is a great conductor compared to something like plastic. If you are interested more about our experiment, here are our results, and pictures of several different homemade and official solar water heaters. ,

Solar Angles and the Sun's Movement:
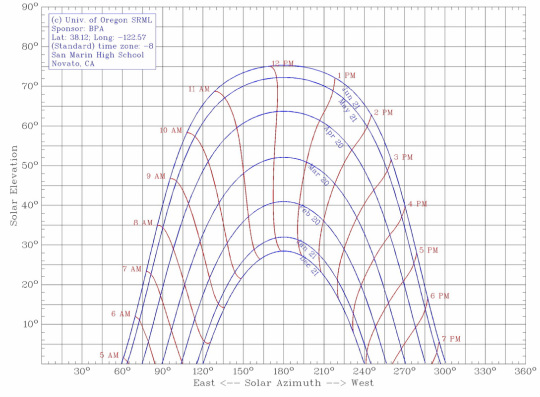
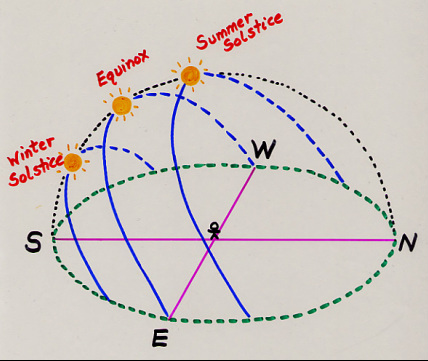
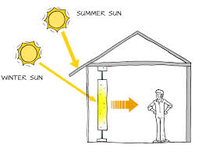
In order to decipher the position of our building and where to place all of its daylighting features, we needed to learn about the sun's movement throughout the day and year. For instance, the sun rises in the east in the morning and sets in the west at night. Most of us already knew this, but we were unaware that the sun is at different heights according to the seasons because of the earth's 23.5 degree tilt. In the winter, the sun is lower than in the summer. Therefore, the winter sun is less intense than the summer sun. The only problem was that we want heat or sun in the winter and less in the summer. Our windows were designed to fit these solar angles. For example, we had to adjust our overhang. The sun is always on the south side, therefore we needed to catch winter light there and try to block the summer sun. Instead of a one foot overhang like the east and west side, we made the overhang on the south side a foot and a half. At this length, we were able to keep out the summer sun mostly and catch the winter sun. Here are some diagrams below to explain the sun's movement.
In order to decipher the position of our building and where to place all of its daylighting features, we needed to learn about the sun's movement throughout the day and year. For instance, the sun rises in the east in the morning and sets in the west at night. Most of us already knew this, but we were unaware that the sun is at different heights according to the seasons because of the earth's 23.5 degree tilt. In the winter, the sun is lower than in the summer. Therefore, the winter sun is less intense than the summer sun. The only problem was that we want heat or sun in the winter and less in the summer. Our windows were designed to fit these solar angles. For example, we had to adjust our overhang. The sun is always on the south side, therefore we needed to catch winter light there and try to block the summer sun. Instead of a one foot overhang like the east and west side, we made the overhang on the south side a foot and a half. At this length, we were able to keep out the summer sun mostly and catch the winter sun. Here are some diagrams below to explain the sun's movement.
Daylighting Techniques:
To observe which daylighting techniques worked better, we conducted an experiment. Each group built there own house out of cardboard and hot glue (ours is pictured below). First, we made a regular home design factoring in the average family's energy consumption for lighting. Then we designed a home with daylighting devices. We compared our new home with the daylighting system to the regular home. It decreased our electricity consumption from 6.036 kilowatt-hours to 5.036 kilowatt-hours (kWh). Below you can see our results and explanations of several daylighting techniques.
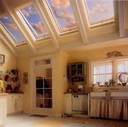
Skylight – This technique
allows a great amount of
light into the home at any time of day, especially at
high noon when the
sun is directly above. We placed our 2’x4’ skylight on our
roof.
allows a great amount of
light into the home at any time of day, especially at
high noon when the
sun is directly above. We placed our 2’x4’ skylight on our
roof.
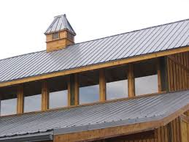
Clerestory Window – This
is placed on our east wall. Its
high placement is great in catching the morning
light. It also receives
light reflected off the light
shelves.
is placed on our east wall. Its
high placement is great in catching the morning
light. It also receives
light reflected off the light
shelves.
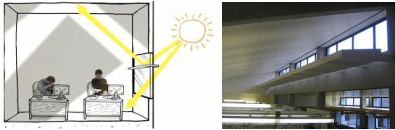
Light shelves – These
shelves reflect light through the
window onto the home’s ceiling, which
distributes the light within the
home. Also, by dissipating the light, the light
shelves reduce glare.
shelves reflect light through the
window onto the home’s ceiling, which
distributes the light within the
home. Also, by dissipating the light, the light
shelves reduce glare.
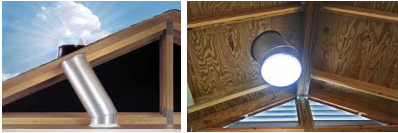
Solar Tubes – These
are pipes placed into the roof to catch and distribute the natural light. These pipes are hollow that contain light reflective lining to disperse light inside the building.
are pipes placed into the roof to catch and distribute the natural light. These pipes are hollow that contain light reflective lining to disperse light inside the building.
Overhang – We have somewhat of an overhang around the perimeter of the building to block out the intense summer sun and provide a shelter from rain. Our south end has an eighteen inch overhang (where the sun hits more directly) while the north end has a six inch overhang. Our east and west sides each have a one foot overhang.
Site Selection:
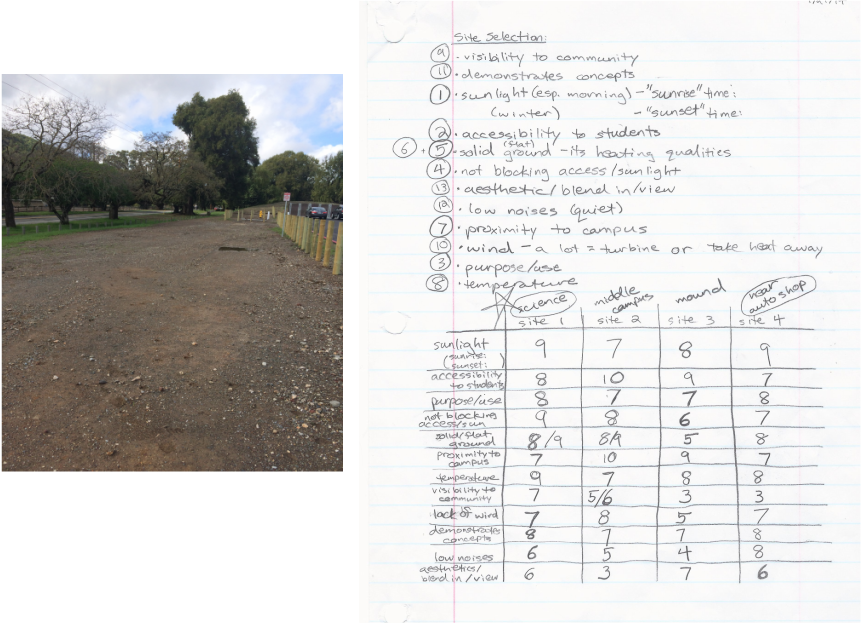
In order to pick the best site for our passive solar tutoring center, we went through some tests to decipher which area would provide the most sunlight and support. We started out by walking around the campus and taking pictures of various spots where there were no obstructions to the sun or hazardous ground that is prone to flooding and damaging the building. We narrowed down our options to the place next to the auto shop, the dirt ground behind the portables, and a grassy patch in the middle of campus. The place next to the auto shop had a dip that was likely to fill with water. This could cause water damage in our building. The grassy patch in the middle of campus had some trees blocking the sun and the construction there would become a real obstacle to students and staff. The grounds behind the portables next to the cafeteria provided a place of great support and no obstructions to the sun nearby. Here are some of the results we got from our research and the place where our tutoring center will be built.
In order to pick the best site for our passive solar tutoring center, we went through some tests to decipher which area would provide the most sunlight and support. We started out by walking around the campus and taking pictures of various spots where there were no obstructions to the sun or hazardous ground that is prone to flooding and damaging the building. We narrowed down our options to the place next to the auto shop, the dirt ground behind the portables, and a grassy patch in the middle of campus. The place next to the auto shop had a dip that was likely to fill with water. This could cause water damage in our building. The grassy patch in the middle of campus had some trees blocking the sun and the construction there would become a real obstacle to students and staff. The grounds behind the portables next to the cafeteria provided a place of great support and no obstructions to the sun nearby. Here are some of the results we got from our research and the place where our tutoring center will be built.
Material Testing:
Different materials can absorb or reflect sunlight more than others. We tested materials that fit under the category of roofing, interior wall, exterior wall, flooring, and insulation. To test these materials, we placed them on cardboard on the counter. Thirty centimeters above, there was a 100 watt light bulb heating the material for forty minutes. We recorded the materials' temperatures every ten minutes as they heated up. Next, we recorded the temperatures of the materials for forty minutes after the light bulb was on. After we collected our data, we analyzed the results and graphed them. Here's what we found out:
- The bamboo absorbed the most heat (5 degrees Celsius) because of its air pockets, similar to how fiberglass batting traps heat. Because bamboo is thin, it also lost the heat quickly.
- The white drywall and PVC pipes reflected the most heat because of its light color. A darker color would absorb more heat. This can be explained in the definition of reflect.
- The redwood flooring was best at holding heat. This is probably because it is a thick material which makes it harder for heat to leave or pass through. The redwood only lost three and a half degrees of its heat.
- The fiberglass batting was best at insulating because of its thickness and its air barrier that traps heat. This creates a greenhouse effect.
Wind Turbine Lab:
The purpose of this lab was to come up with an alternative energy source. Our passive solar home used no electricity therefore was ecofriendly and cost efficient. For the future, we tried to create a device that would provide electricity for the building. We designed wind turbines. These long winged wheels rotate by wind to generate electricity. Some regions have wind farms with over six hundred wind turbines to produce electricity. Some well known wind farms are the Tehachapi Wind Farm on the ridgeline between the Mohave Desert and the California Central Valley and the San Gorgonio Pass in Palm Springs. Both these sights are in especially windy places and do not interfere with animals' habitats and civilization. They are able to generate up to eight hundred ninety-three gigawatt-hours of electricity. Wind turbines can be very successful.
There are two types of wind turbines. One is a Horizontal Axis Wind Turbine (HAWT). These are the most common type of wind turbines due to the fact that they are more efficient. Not only do they have wind but gravity also acts on the turbines, as well. Also, HAWTs reach a higher elevation, therefore they catch more wind. The second type of wind turbines are Vertical Axis Wind Turbines (VAWT). In our data, the HAWT's maximum speed was 2.2 volts, and the VAWT's maximum speed was only 0.2 volt. Obviously, our HAWT was much more successful at producing energy.
Our experiment consisted of a plastic axis with vanes made from manila folders. We attached them to a stand then held a fan in front of the wind turbine. The device gauged the wind turbine's voltage and we recorded the data.
Oddly enough, with some experimentation, we found that when there weren't any pegs supporting the vanes, the wind turbine produced more energy. We found that this had to do with aerodynamics in the HAWT. Our best design was a simple circle of paper with a couple of slits. With our VAWT, we strived to build a device that would only allow wind from the fan in on one side or direction. This would avoid wind coming from opposite ends and creating resistance. Unfortunately, we were unable to design this device with our materials. Instead, we built vanes that were shaped like an L to give a greater surface area for the wind to blow on. Below are some sketches of our wind turbines, some pictures of wind farms, and some of our data.
Building our Passive Solar Building:
After all this preparation, we were sent on our own to build our passive solar home. We first had to decide on a usage for the building. We thought since it was near the library and science buildings that it would be the perfect place for students to take make-up tests or to hold their tutoring session.
Secondly, we had to plan out some key features that will make our building stand out from other buildings. We started with a skylight to heat the building during the winter, clerestory windows to catch the morning light on the west side, light shelves, a big picture window on the south side to always catch some sun, insulated windows that let in heat and keep it in, and overhangs that block out the intense summer sun but allow the windows to catch winter sun. Our biggest selling point was "The Device". This is a mirror on the north side of our building that reflects light from the south into the north window. The north usually doesn't receive much sun so this is an asset in the winter.
Next, we needed to make blueprints in order to sketch out the building's structure. This took a lot of trial and error to make the blueprints adequate. For the windows, we needed to add a header to prevent the roof from crushing the window. Our flooring blueprints were taken from deckplans.com. This showed our pier foundation that raised the house just enough to prevent any drainage issues, but also keep the building close enough to the ground in order to keep in more heat.
Then we procured a material and cost list. This was quite a meticulous process. Each item was researched for future purchase at Home Depot. We finally came up with a cost of $3,800.30 including tax, tools, nails, and screws.
Finally, we made our scale model of our passive solar tutoring center. Our group used Sketch-up by Google to make a virtual model. This included beam structure and exterior features.
On March 12, 2014 (two days before Pi day or Albert Einstein's birthday), we had a presentation night to display our designs in front of the community and a panel of engineers. Unfortunately, I was unable to make the event due to a state basketball game. I found out the next day that our building was among the top three best designs. Ours would be the design they mainly refer to in order to construct this San Marin building. Our building was described as simple enough to build, with a few complex features (like "The Device") that made it stand out from the other designs. Looking back, it was a long road to get to this point, but it was all worth it.
Why Solar?
Many are probably thinking why we chose to build a passive solar home. As years pass, it is even more important that people consume less electricity. Most of our electricity in our homes comes from power plants which are not ecofriendly and fossil fuels which will run out in about a hundred and fifty years. Below is justification to why we chose to build a passive solar tutoring center.
Many are probably thinking why we chose to build a passive solar home. As years pass, it is even more important that people consume less electricity. Most of our electricity in our homes comes from power plants which are not ecofriendly and fossil fuels which will run out in about a hundred and fifty years. Below is justification to why we chose to build a passive solar tutoring center.
Physics Concepts:
Heat - a form of energy, usually obtained from light
Radiation - energy transmitted by rays, waves, or particles (Ex. the sun's rays through space)
Conduction - transfer of heat through a specific solid material (Ex. heated pot cooks food)
Convection - transfer of heat through liquid, gas, or any other fluid
Insulation - lacking ability to transfer heat; create a greenhouse effect to trap heat in air pockets (Ex. fiberglass batting to keep heat in our house)
Absorb - to take in and retain the energy that is not reflected or transmitted
Reflect - when light and other forms of energy are not absorbed or transmitted through a substance but bounced of the surface (Ex. we see color because the color that is reflected of the material is the color we see the object as; the object reflects the color that is present in the object)
- dark colors absorb more light/heat (Ex. our dark brown exterior walls absorb more heat to warm the house in the winter)
- light colors reflect light (Ex. our light shelves are painted white to reflect lights into the window into the home)
Temperature - the property of materials that tell you whether they have heat (warm or cold) (Ex. we used temperature as a testing device to decide which site on campus would give our building the most heat)
Laws of Thermodynamics - 0th) If two systems are in thermal equilibrium (same temperature) with a third system, they are also in equilibrium with each other. (Ex. If a pencil and eraser are both the same temperature as the table they are both on, they are the same temperature as each other.)
1st) Energy can neither be created nor destroyed. When heat is added to a material,
it transforms into an equal amount of some other form of energy
2nd) Heat always flows hot to cold. This also states that in natural processes, entropy (disorder) always increases.
(Ex. summer heat flows inside home and heat inside home escapes to the cold outside in the winter)
3rd) Temperature can never get to absolute zero (-273 degrees Celsius, -460 degrees Fahrenheit, zero Kelvin)
Specific Heat - the quantity of required to raise the temperature of a unit mass of a substance by one degree Celsius, or one Kelvin; water has a high specific heat because it absorbs a large amount of heat but it absorbs it slowly than land (Ex. thermal masses made of concrete or stone are placed in buildings' walls to absorb in a large amount of heat)
Pressure - force per unit area in which the force acts on (atmospheric pressure, liquid pressure) (Ex. deeper in the ocean, the more pressure - a balloon will compress by half every 10.3 meters of water depth)
Fluids - anything that flows, specifically liquid (water) and gas (oxygen)
Gases - the state of matter distinguished from the solid and liquid states by relatively low density and viscosity, relatively great expansion and contraction with changes in temperature and pressure, and ability to distribute throughout container; fast moving particles (Ex. some gases that pollute the air are produced when trying to supply electric energy - this is part of the reason we are building our passive solar home)
Buoyancy - weight of water from displacement; when an object is submerged in water, an upward force is exerted on the object in the opposite direction of gravity called buoyant force (Ex. easier to lift a boulder under water than on land because of buoyancy and its buoyant force)
Conversion of Temperature - Degrees Fahrenheit = Degrees Celsius(9/5) + 32
- Degrees Celsius = (Degrees Fahrenheit - 32)5/9
Specific Heat Capacity Formula - Q = mc deltaT
Thermal Conductivity - a measure of the ability of a material to transfer heat (Ex. In the solar water heater, the copper had a high thermal conductivity, like most metals. Metals are good conductors because their closely packed particles create vibrations that quickly send heat through.)
Bernoulli's Principle - pressure in a fluid decreases as the speed of the fluid increases (Ex. airplane wings are designed to follow this principle - flat bottom and curved top; air will flow faster on the curved top to meet back at the same time as the air moving along the bottom of the wing; when the air above moves fast, there is less pressure above than below the wing, creating a lift)
Ideal Gas Law - all collisions between atoms and molecules are elastic and there are no intermolecular attractive forces; all internal energy is in kinetic energy form; any change in internal energy results in a change in temperature (PV = nRT)
Boyle's Law - when constant number of molecules at constant temperature, the product of pressure and volume is constant; pressure and volume are inversely proportional meaning when one goes up, another goes down (P1V1 = P2V2) (Ex. decrease a tire's volume by a third, the pressure will increase by three)
Archimedes' Principle - an immersed object is buoyed up by as force equal to the weight of its displaced fluid (Ex. a boat floats because the weight of the water it displaces also buoys the boat up.
Reflection:
Our passive solar home project went exceptionally well. Each member equally contributed to our final product. Different components were augmented by the knowledge of other group members. Poh, Max, Sarah, and I all gelled. All of us were picked from a diverse bunch of people, and we all had our differences. We also had our niches that we specialized in. Poh is a creative person who always thinks outside of the box. He is the mastermind behind "The Device". Max is great using a computer. If not for him, we wouldn't have had our digital model of our energy efficient home. This showed our beam structures and external features. Sarah is a very organized student. She was a lifesaver making lists of materials, their costs, and places we can buy these supplies. I sketched out some blueprints after seeking advice from Mr. Williams. When it came all together, every detail was executed to a tee. It showed that no specification on our building was neglected. Our group worked very well together.
Even though most of the process went smoothly, we did have a few bumps in the road. One was that we were too focused. We all are people too engrossed in our work. Sometimes, we would forget to collaborate and communicate with each other when we were intent on our own criteria to meet. There were days we never talked to each other because we knew what we had to do. In the future, we can practice working as a group a little bit more just to check in. If we had missed a crucial part of the project because we didn't communicate, we would suffer extremely. Secondly, our group could have thought more about the audience that we were presenting to. Our presentation consisted of a poster and a laptop with our digital model. Especially when presenting to students and engineers, we should have factored in a physical component. People are more engaged when they can look at diagrams and models that they can touch. This would improve our presentation. Lastly, our group was way too serious. Looking back, we had some wiggle room to experiment with different designs and try more unique architectural designs of wind turbines. Engineering is a creative field where there are no wrong answers. I will definitely allow room for a good laugh on our next project.
I gained two important skills during this extensive project. To start with, I reached a point of comfort when not being the leader. For the last few projects, I've been striving to be less controlling. In other words, not be the "Miss Bossy Boots". I felt this project required less of my control. Each member was always on task and ready to handle anything that hits them. I think I achieved my goal of participating as a fellow group member instead of a tyrant. In this process, I discovered how many great ideas can accumulate if we combined all our thoughts. A leader is more needed for organization, but with content, we all can contribute in the most discombobulated way. Bill Gates grew up one of the most disorganized students, but his innovative mind prevailed in the future. This project opened my eyes that all people have different, but all equally amazing ideas. The second life lesson I learned was friendship. It fascinates me how relationships form. No friendship can be forced. It is a random evolution. One day you will wake up and realize you have made a friend. It is a natural process if you connect. In jobs, you will be placed with people you don't even know in a group. Making the effort to befriend your "teammate" can benefit you in the future. After spending two months with my group, I got to know them exceptionally well. I knew what the other was thinking. When presenting in front of your peers and when the butterflies are fluttering in your stomach, it is nice to feel relaxed when you know your group member is by your side. I learned that even if you aren't friends, getting to know one another will pay off in the end.
Needless to say, there are many skills I need to improve on in group collaboration. First, the deadline isn't the all time ruler. Schools emphasize on getting good grades and being obedient in class. What I dislike about this curriculum is that life won't give you multiple choice. Students memorize the material to ace a test, then it leaves their brains forever. Jobs won't give you an answer. Companies will pay you to find the answer without any background information. A creative mind thrives upon this system of loosening the reins. Schools indirectly frown upon these creative minds to conjure different possibilities. Very often, there is more than one answer. In this project, I was too focused on the deadline instead of the content. For example, in the water heating experiment, the instructions were clearly proven ineffectual. Poh had a unique idea to extend the amount of time the water was inside the copper and plastic tubing. I was worried we wouldn't finish in time changing our design, but Mr. Williams said it was fine as long as we have been working this whole time. After a few circulations, it greatly increased the water's temperature. I am that student who obediently sticks to the directions. It doesn't matter when it needs to get done. A product that has had ample time put into it tramps over a mediocre on time project. Who knows; it might benefit future projects. Secondly, I should improve my public speaking skills. Consistently, I use note cards for my presentation. Sometimes I'll blank out in front of the audience and won't know where to go. Just having an information source to rely on can make a presentation much more comfortable and confident. For the future, I would like to leave out the index cards. It looks more professional when you're calm and confident when presenting, and those cards won't always be there for interviews and other presentations. By working on these habits, I hope to be a better group member and presenter.
No matter the situation of a group, there are going to be some peaks and pits. I think of it as a group's recipe. Each one is different in its own way. The group's problems along the road are just solutions waiting to be solved. No group will ever be perfect. Here were some of our group's peaks and pits:
Peaks
1. Great at brainstorming out of the box, unique, and creative ideas. "The Device" helped us stand out to other designs.
2. Always prepared. Max always had the laptop and we practiced our presentation at the least five times.
Pits
1. Communication. All of us are efficient workers that like to focus on the task given to us. At times, we needed to communicate more to each other so our project would seem like one whole. For example, one time Poh and I were researching the same exact topic without knowing it.
2. Time management. In the beginning, our group excelled at staying on schedule. We procrastinated on starting the display board which would have given us more time to focus on details.
